Continuation of my previous tutorial. Here I’m covering briefly how to do the house’s edging and frame pieces, and a bit of the painting process.

While this can also be done with balsa wood strips, here I used pieces of matte board cut into rectangular strips. Simply cut to fit the edge of each section of the house, and then glue them down. It’s important to get the angles as close as possible for a tight fit, especially in places like the cross bar above.

A view of the side pieces.

For this section the easiest way to get the right curve on your pieces is to take the template you’ve made and trace out the roof curve on paper to make a template for the curved pieces seen above. I hope that makes sense, it sounds a bit complicated but it’s really not.
The little piece sticking out at the very top of the roof is a section of bass wood cut at a slight angle and glued on with superglue.

The house's door.
The front door is a piece of balsa wood, cut down into a door-like section and glued down. Do this first, and then make the frame with thin section of matte board or, in this case, more bass wood.

Toothpicks! These fancy toothpicks are cheap, and the ends make great doorknobs and window hinges. Just take your craft knife and carefully slice off the tips of the toothpicks.

The window is made the same way as the door.

Doorknob.
Those cheap acrylic craft paints from Hobby Lobby or Michael’s are great for painting terrain projects. They usually run about $1-2 per bottle, and you get a ton of paint in each. I have six or seven bottles in various browns, greys, etc that I use for these kinds of projects.

Coat 1 on the roof.
The roof will take multiple coats of paint, since reds are generally finicky. This is a mix of red and a lighter grey. For the house walls, I’m using a tan brown, which I’ll weather later. The trim will be painted in a black/grey shade.

The front of the house in brown.
And here is the house with the roof finished.

Right now the chimney still needs painting, as does the trim. The house will also get some weathering to make it look more worn and lived in. But that’s the basics of the tutorial. The same principles can be applied to other types and shapes of houses as well.
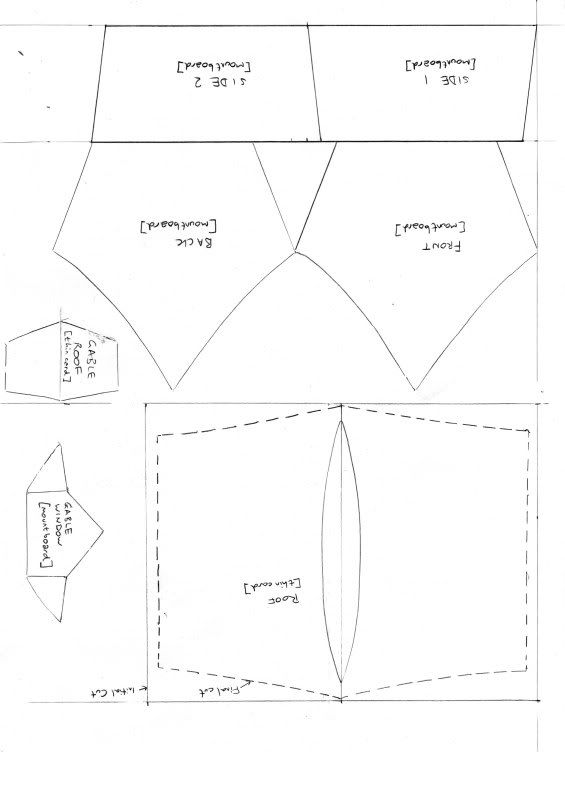
Finally, this is the original house template that I downloaded years and years ago, when I first found the tutorial for these houses on the Privateer Press forums. It prints out pretty well on a regular sheet of paper.